Taming the Baste

You may be wondering what ever happened to that dress I was working oh, so many moons ago in summer 2015. Well, when my many yards of special-order fabric finally arrived some time in August, I took all of the carefully drafted patterns, the altered mock-up, that lovely white voile, my practice overbodice, and . . . proceeded to do absolutely nothing with any of it ever again. Yup. All that preparation and I never finished it. Good job me.

What I did do was talk with my internship supervisor about what dress I should recreate for the final project, decide on a dress, research the dress and realize I was lacking important visual and contextual information, pick another dress, receive word that the institution currently in possession of that dress was adamantly opposed to the existence of a recreation, and finally settled on an entirely different dress which is distinctly un-famous but photographed in exceptional detail.

AnthonyStanton

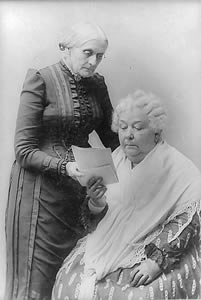
The dress on the left is the one I finally chose to recreate. Decorative details, closure, and silhouette were all easy to see in the various photographs showing Anthony wearing this garment.

With the dress selected, I charged ahead. I drafted a budget, received approval and funding from the museum, drafted my patterns, and made my mock-up. One of the most important aspects of historical clothing is silhouette, which must be built from the inside out. Even though the dress I made is going to be on display rather than worn by an actual person, I needed to emulate the undergarments which would have been worn under this kind of dress. The dress I chose to recreate appears to be from the 1880s. The shape of the skirt would likely have been created with a lobster tail bustle or tornure.

busltefit

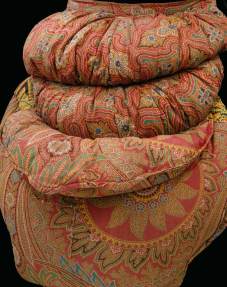
Example of a long lobster tail bustle from the Fashion Institute of Technology Museum collection (http://exhibitions.fitnyc.edu/exposed-lingerie-history-blog/2014/08/07/corset-bustle-circa-1880/)
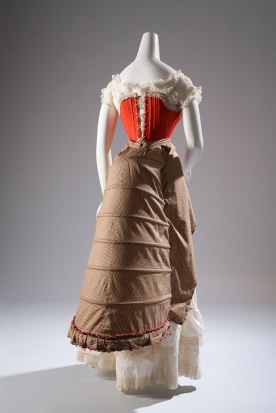


tornure

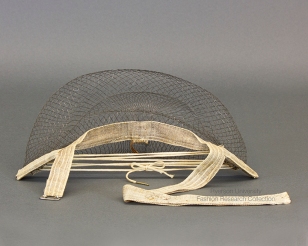
Example of a wire mesh tornure, which would only have extended to the wearer’s thighs. (https://ryersonfashionresearchcollection.files.wordpress.com/2013/10/frc_acc_other_2013-99-001_frt_web.jpg)

For the first support layer I created something like the fabric bustle from the V&A, hoping it would retain the proper shape and serve as a firm foundation for the heavy skirt I was about to construct. Over this I put a second layer made from gathered netting, to add just a little more shape and volume between the primary bustle/tornure and the petticoat. Obviously nylon netting is not historically accurate, however it has a similar texture and stiffness to horsehair, a popular material for tornures in the late 1800s. Next came the petticoat, which serves in part as a buffer between the understructure and the outer skirt, smoothing lines and preventing the bustle frame (or in this case, rough nylon netting) from rubbing and wearing on the principle garment.

0826162228

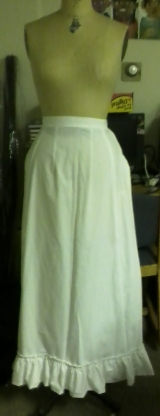
Front view of the petticoat

0826162108a

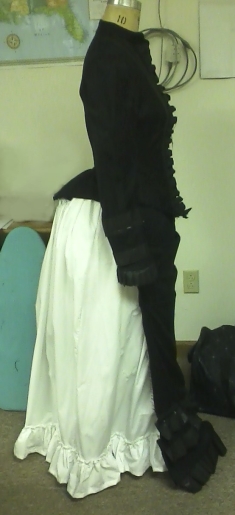
Side view of the petticoat, showing how the bodice drapes over the slight bustle.

The most challenging part of the process was the detailing on the bodice. The front panels consist of alternating strips of moire and the primary fabric (which I was told by a few experienced historical sewers may have been a silk twill) with moire ruffles running lengthwise alongside the center button placket. The sleeves of the bodice are decorated with moire ruffles at the cuff and two bands of moire on each sleeve at the wrist.

0213162129

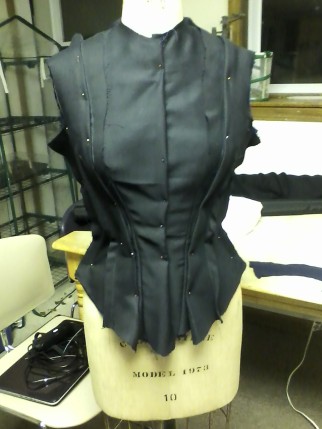
Constructing the bodice involved a lot of trial and error, a great deal of of draping, many hand-basted stitches, and more audible frustration than I care to admit.

0826162109a

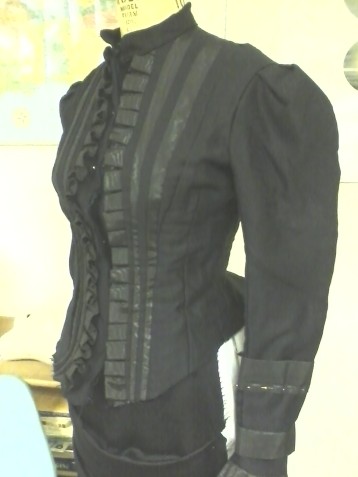
The almost final result

The bottom hem was finished off with some self-bias (making this was an adventure of its own!) and inside the bodice I attached boning (in black twill casing) to all major seams and darts. The photographs of Anthony’s original dress clearly show a button closure at the front of the bodice. While the bodice was in progress, I spoke a bit about the project at a Susan B. Anthony Birthday event held by the Susan B. Anthony Birthplace Museum. Afterwards, an enthusiastic museum supporter offered to write a supplemental check so I could purchase vintage buttons. I did so, but the shanks (the loops on the backs of the buttons where they attach to a garment) were made with fabric which had become too brittle to withstand the tension of holding the bodice closed. I attached the buttons to the front of the bodice but used hooks and eyes as the functional closure.


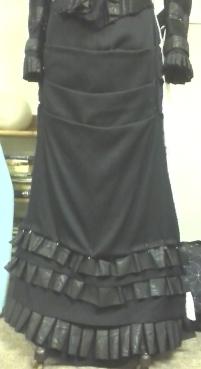
After all of my work on the bodice, I thought the skirt would be a breeze. I was quite mistaken. The individual components of the skirt were fewer in number and simpler in construction, however I did not anticipate the challenge of working with very large, heavy, and slippery pieces of fabric which needed to be draped, pinned, and sewn without shifting between steps. The pickiest part was the closure, which I did my best to hide between the strips of moire and twill. I used wire hooks and eyes, very common for skirts in the 19th and early 20th century.

0826162110a

Front panel in process


By the end of this project, I was more than ready to be done. It was months past my original deadline, I had transported the dress form, my sewing machine, and all of the materials between two houses and two dorm rooms over the course of a year, and even brought the partially finished mock-up on a train from Massachusetts to Minnesota and back again over winter break.

My biggest frustrations upon completion are:

  1. The dress is not made to Susan B. Anthony’s measurements. It is made according to my dress form’s dimensions. I got approval for this ahead of time, but I wish I had tried to find out the correct measurements so I could pad the dress form and make a more accurate representation.
  2. My dress form is not made to imitate a corseted woman’s figure. The dress form purchased by the museum was made to imitate a corseted woman’s figure. My dress should have been made to fit a corseted woman’s figure.
  3. The finished bodice did not fit the dress form as well as the mock-up, or as well as the bodice had fit while still in progress. In trying to figure out why, I came across an extremely helpful article on Jennifer Rosbrugh’s website about the need for ease (extra girth added into the pattern) in historical garments. I should have added an extra 5/8 of an inch or so to compensate for the extra layers inside the bodice (i.e. the lining, boning, and boning casing).

Still, overall I am very pleased with how the dress turned out. It’s less than perfect (any experienced seamstress can pick out some of the little flaws here and there) but I do believe I did the best I could. And if nothing else, I learned a lot while making this dress which will help me in future projects.

This whole project was in preparation for the Centennial of Women’s Suffrage. The plan for my dress is to circulate it through the Massachusetts InterLibrary Loan system in the year leading up to the centennial, making stops at selected libraries around the Commonwealth as a temporary display. For an overview of speakers and events planned in Massachusetts, you can visit the Celebrate Suffrage website.


Mount Homework Forever Shall Be

In spring of 2016 I transferred to Mount Holyoke College as a first semester Junior. I knew the workload would be heavier than what I had experienced during the first two years of my undergraduate studies, but I couldn’t resist the call of the castle-like library, the school’s nearly two hundred year history, or the astounding assortment of classes offered across the Five College Consortium.

0209160823-e1527435053895.jpg

The Mount Holyoke College Library, January 2016

After four semesters and two museum internships I have constructed a model Neolithic Irish hut, started learning two new languages (and one new alphabet), co-authored a NAGPRA repatriation proposal, co-curated an exhibit and helped install two others, been in the same room as a lock of Emily Dickinson’s hair (twice), dug my first test pit at an archaeological site, formed friendships with wonderful people from around the world, and gained numerous grey hairs.

14567420_1421849777842423_4534116189841212615_o

Neolithic Irish Hut, mid-thatching, constructed by my friend and myself with help from classmates as a final project for our course on Ancient Ireland.

While attending Mount Holyoke, my costuming projects have been few and far between. I finally finished the dress for the Susan B. Anthony Birthplace Museum in fall of 2016, after a few roadblocks and delays.


The past three summers have seen me rushing through cosplay construction in preparation for Connecticon, a fan-run convention held in Hartford.


This slideshow requires JavaScript.

And finally, despite my heavy homework load, I did manage to throw together Halloween costumes at the last minute. In 2016 my friends helped me to create a steampunk character who worked as a librarian by day and an interfaith exorcist by night. Last year I attended the Mount Holyoke “Get Your Geek On” Halloween dance dressed as Sophie from Howl’s Moving Castle, complete with a Calcifer prop.

1024172240

Iced tea bottle, Sharpies, and a little acrylic paint

Now that I have graduated with my B.A. I have decided to take on more ambitious projects. First on the list is a mid-19th century corset, followed by all accompanying undergarments. I have black and green silk begging to become a Civil War Era dress, but before I can begin I need to make period underpinnings to create the proper silhouette.

0302182137

Progress on the corset so far – still trying to adjust the pattern matching.

The Dress, Part Three: Failure at the Fabric Store.

I give up. That’s it. This dress just is not going to be made from historically accurate fabric. From this point forward, my primary concern will be technique.

I had three options when I went to the fabric store:

1) get the terrible cheap costume satin

2) wipe out my checking account to buy 100% silk dupioni (I budgeted for $10 a yard and even with my 50% off coupon it would have been almost $17 a yard. May not sound like much, but at 14 yards it adds up quickly!)

3) buy not-at-all natural fiber “shantung” fabric with a fake silk texture for about $4 a yard

As much as I wanted to buy the silk (and believe me, I spent a good ten minutes gazing at it longingly, contemplating the merits of white-bread-and-peanut-butter diets) I went with the responsible choice and got the $4-per-yard stuff. It hurt, but spending half my budget for the same amount of fabric almost made up for it. Now I just have to wait for it to be shipped in, because they didn’t have 14 yards on the floor and had to order it from their warehouse. The young woman at the cutting counter was very curious as to why I required 14 yards of black shantung fabric, but once I explained we started discussing the pros and cons of petticoats and crinolines. Our discussion moved to her project (a 1950s style dress with a red Marvel print bodice, yellow midriff panel, and blue skirt reminiscent of Wonder Woman’s outfit) and we ultimately discovered that we’d both be attending Connecticon in July.

The shantung is definitely too thick to make nice small pleats (or to wear in double layers), so I also found what I think is an adequate lightweight fabric for the pleated panels on the bodice. Unfortunately it, too, is very synthetic, but as I said before: I’ve given up on accurate materials. I don’t think the lighter fabric would be tough enough to make up the entire dress and hold together, or give the skirt the right weight and body, so I hope the two fabrics look alright together.


This gives you some idea of what the bodice/dicky fabric will look like together

This gives you some idea of what the bodice/dickey fabric will look like together

While Visions of Bodices Danced in Their Heads (The Dress, Part Two)

I have a terrible tendency to tunnel vision. Really, it’s almost a danger to my health sometimes. I took a break from chores at about 8 o’clock this evening, and now it’s 1 o’clock in the morning and I’ve been sitting here the whole time getting pulled into an internet sinkhole following layer after layer of links to pictures and articles about 19th century clothing. I haven’t even eaten dinner yet!

. . . it counts as homework, right? Homework is a justifiable reason to stare at a computer screen for five hours . . .

. . . isn’t it?

Anyway, on to the important matter at hand: Progress on the Practice Dress.

I have now met with The Master twice, once to draft a pattern for the dress bodice/sleeves/dickey (white insert beneath the bodice – think tuxedo insert), and once to modify the pattern pieces since the muslin bodice mock-up didn’t fit quite right. I also have one of her dress forms on loan and a basic idea of how to try draping the fabric for the dickey.

A couple of weeks ago I took a trip to the fabric store and got a lightweight white cotton to serve as the base for the dickey and a lovely thin voile which I will attempt to drape over the dickey backing with some pleats for decoration and fitting. (yes, it’s a cotton/poly blend, but it doesn’t feel particularly synthetic and it was on discount, so shush.)

voile2

The Voile: draped, looking lovely in natural afternoon light

The Voile: spread out to show how fine it is

The Voile: spread out to show how fine it is

For modifications, we’re taking in the back seams and adding a dart at the bust of the bodice (which will be worked into the pattern piece since the bust dart isn’t historically accurate). We had to make the sleeves wider at the top to fit into the armscye (armhole, where the sleeve meets the bodice) and I have to modify the cuff end of the sleeve by making it larger around or adding enough seam allowance to accommodate buttons so my hand can pass through easily. (Either somebody had teensy hands or I measured the sleeve pattern wrong, but either way my hand is not going to fit.) The Master also shortened the bodice because it wasn’t sitting well at it’s former length, but I’m not so happy with that modification. I’m almost certain that the shorter bodice wouldn’t have been around at the time the photo was taken (especially since the dress may have been a few years old already), and the front of the bodice probably has at least a subtle point to it.

Halfway through altering the back seams

Halfway through altering the back seams (apologies for the slight blur)

The oh-so-inaccurate bust dart, now worked into the paper pattern

The oh-so-inaccurate bust dart, now worked into the paper pattern so it won’t need to be sewn next time.

That little triangle pointing off to the right is what you can see of our additions to the sleeves. (Unfortunately I forgot all about the epaulettes, so I'll have no idea if the modified pattern works until I put on the other sleeve)

That little triangle pointing off to the right is what you can see of our additions to the sleeves. (Unfortunately I forgot all about the epaulettes, so I’ll have no idea if the modified pattern works until I put on the other sleeve)

The plan is to extend the bodice, modifying the front side darts as necessary, so that it sits just above my hips with a point in the center extending over the top of the skirt. The Master and I have decided that the dress probably didn’t have any closures in the back, so I’ll put in hook and bar or hook and eye closures in the front hidden beneath the bodice pleats. I haven’t decided yet whether I’m going to make the bodice and skirt completely separate, fully attached, or if the two pieces will be attached in the back with independent closures for the bodice and skirt.

Rough idea of where the point will fall/sit

Rough idea of where the point will sit

The book ‘Costume in Detail’ by Nancy Bradfield shows a dress from 1858 with a similar bodice and it has a closure on the skirt just to the left of center with a little watch pocket in it. Unfortunately, I cant really see the skirt on Anthony’s dress in the photo, which means I can’t be certain of how it was constructed, but I suppose that could be thought of as an advantage.

I also found a mid-1800s day dress in a similar style on Etsy and I was able to get some construction details from the vendor. The bodice is edged in self-bias piping (strips of the bodice fabric were cut on the diagonal of the grain and sewn around cording, then attached to the edge of the bodice) and whip stitched to the skirt. There is a closure in the center front of the bodice and the opening continues into the top of the skirt, concealed by the cartridge pleats (which look like gathers) on the skirt. I might try this method.

My greatest hope is that I’m not making a terrible mistake with the pattern, and that my assumptions about closure location, bodice length, and construction are correct. Several mid-40s to mid-50s bodices have closures in the back, with the bodice opening continuing into the top of the skirt. Some of the bodices also have extra boning in the center front where it slopes to a point. It’s driving me crazy not knowing for sure how this dress was constructed and exactly what year it was made! But I suppose I should get used to working with incomplete evidence like this if I want to be an historian of any sort.

A Grand and Exciting Undertaking, or, How I Became a 19th Century Fashion Addict (The Dress, Part One)

Thanks to a fortunate alignment of events, my first summer project is to recreate the dress in this photo of

Susan B. Anthony ca. 1856.

Photo found on the Five College Archives and Manuscript Collections http://asteria.fivecolleges.edu/findaids/sophiasmith/mnsss129.html

Photo found on the Five College Archives and Manuscript Collections http://asteria.fivecolleges.edu/findaids/sophiasmith/mnsss129.html

Later this summer, I will be working as an intern at a local historical museum. In this particular program, each intern works with their on-site supervisor to develop a project that will benefit or enhance the museum while aligning with the intern’s interests. When I first called the museum to inquire about the program, the woman I talked with was very excited to hear of my interest in historical clothing and reenactment. The way she was talking, you’d think it was unusual to find a 20-something who would willingly spend hours sewing and wearing four layers (give or take) of heavy, constricting clothing – go figure! A few weeks later, my interview covered a variety of topics from Downton Abbey to “The Wonders of Homeschooling,” and ended with both of us barely managing to remain professional in the face of our bubbling excitement about my project: recreating one of Susan B. Anthony’s dresses.

This could possibly be the perfect project for me: I have an excuse to pour over photos of gorgeous dresses, read for hours on end about some of my favorite subjects, shop for fabric, sew, and parade around in a mid-nineteenth century dress with all the fixin’s. In short, my version of Nerd Heaven. However, when I finally finished scooting through the house doing little happy-dances, I realized that I’ve only ever made historical clothing from store-bought patterns, using a modern sewing machine for EVERYTHING, and settling for bargain bin, all-synthetic fabrics. The more research I did, the longer my “skills to acquire” checklist became. I also realized that I would need a lot of information from reliable sources, and it can be difficult to find those on the internet.

So, first chance I got, I sent a general plea for help to three of my most knowledgeable acquaintances: two who manage the costume shop at a local college where I dance, and one local costumer and seamstress with whom I had an apprentice-like position several years ago (and whom I tend to simply call “The Master”). The next day I had enthusiastic replies from all of them saying they’d be happy to help, and a few days after that I went home with an entire tote bag full of magical books with everything I needed to get started, plus some really neat bonus information.

(For instance: did you know that in the 16th century, some women wore corsets made entirely of iron?)

“For difficult or deformed figures” (Left photo from The Wallace Collection, Right photo from the Victoria & Albert Museum, full image from ‘Corsets and Crinolines’ by Norah Waugh)

My plan is to make a “Practice Dress” with help and input from more experienced sewers so I can learn all (or most) of the techniques I’ll need when I make the “Real Dress” later this summer. So far, I’ve had two meetings with The Master so she could help me complete the first few steps in recreating the aforementioned dress.

credit to the  University of Rochester http://www.lib.rochester.edu/index.cfm?PAGE=4281

Credit to the University of Rochester Department of Rare Books and Special Collections http://www.lib.rochester.edu/index.cfm?PAGE=4281

The photo is captioned with the year 1856, and the style of the bodice looks like pictures I found of:

“German Day Dresses” from the mid 1850s and early 1860s

as well as “Fan Front” dresses from the ’40s through 50’s.

It also nearly matches drawings of dresses from the same time frame in the book ‘Costume in Detail 1730-1930’ by Nancy Bradfield and photos of an 1840s Mourning Dresses made from silk (found on this site of 19th Century Mourning Clothing).

I’m not quite sure how the white center of the bodice is attached; it could be an insert attached by hooks, some variation of a chemisette or dickey, or it could be sewn under the tucks on each side with closures down the front (which I think is less likely, since something so light would be easily soiled and most collars or cuffs of the time were detachable for easy washing).

On to the muslin mock-up!

Enter Title Here, or, My Three-Month-Old TFioS Ramble

5/24/2014

Today’s project has been to (finally) read John Green’s ‘The Fault in Our Stars.’
Yes, I know I’m a bit late.
Yes, I know this post will most likely be lost in the flood of blog posts all scrambling to get their voices heard in the pre-release hype surrounding the TFiOS movie.
And yes, I know I’ll probably be repeating things that have been said and said again by readers around the globe.
BUT . . . that doesn’t stop me from speaking my mind because I know at least a handful of people out there will appreciate my words for one reason or another, and just maybe this will find someone who hasn’t read the book, and someone somewhere (or perhaps a million different people, all over the world) have said something to the effect of “It is worthwhile to say what you need to say, even if it only benefits you.”
Please forgive that monumental run-on sentence.

To begin with, let me admit that at the moment I am only on page 125 of 313 – and yet, if the book were to somehow end in the middle of a sentence on the next page, I would still be in love with it.
I’m not one to fangirl, I’m not one to become obsessed with fictional characters (well, maybe just a teensy bit), and I’m not one to become surgically attached to mediocre literature. I read the Twilight books, decided they weren’t worth the hype, and couldn’t take the movies seriously. I nearly jumped out of my skin waiting for the final books of the Harry Potter series, but after my “I’m twelve, I could still get my letter from Hogwarts” stage, I moved on. I think John Green is an awesome person and his life teaches many valuable lessons and provides numerous sources of inspiration and encouragement. I would love to sit down with him and pick his brain for a few hours, if he ever had a few minutes of free time. But if I saw him on the street, I’d probably just smile, wave and say “Hi” as I walked past. I wouldn’t scream, I wouldn’t hyperventilate, I wouldn’t ask for an autograph.

That being said: It has been years since I encountered a book I didn’t want to close, even for a minute. Maybe I wouldn’t be so fanatical about this book if it weren’t the first book I’ve read for the sake of enjoyment in . . . a year? Two years? but I would still be in love with this book. The last time I read a book without wanting to put it down was when I read the Hunger Games trilogy (Mockingjay? SUCH a let-down! First and only time I ever yelled involuntarily at an inanimate object), and this book has me even more captivated.

I think Shailene Woodley was on to something when she called John Green the “Teen Whisperer.” In some ways, I feel utterly disappointed in myself because the characters in ‘The Fault in Our Stars’ seem more human and animate than I am on a daily basis. Their personalities are more defined than my chameleon personifications of myself could ever be. But so many of the thought processes, emotions, and awkward baby steps into a relationship are replicas of my own experiences. The early interactions between Augustus and Hazel are a lot like the interactions between my boyfriend and me. I remember my own moment of “Flirting was new to me, but I liked it.” I remember talking on Facebook late into the night – or rather, early into the morning – and floating into that “invisible and tenuous third space” where it was just us and all of the bad things in the world could be forgotten or turned into a joke. I remember sitting on the couch with space between us until my mom gave us the “awh, they’re so cute” meets “all-knowing mom” smile and gave us permission to scoot in closer. And there are quite a few similarities between Augustus and my boyfriend – not so much the cockiness, or metaphorical resonances of his actions, but the way he wholeheartedly swooped in to care for me, even though my mom was dying and he’d just lost his and neither of us knew what was going to happen or how rocky things might be for us.

And I see how Green’s encounters with Esther gave life to Hazel. The way he wrote Hazel and the flavor she lends to his writing sound so very similar to Esther’s voice that in a couple places it’s almost as if SHE wrote the book instead of Green.


8/31/2014

I finished ‘The Fault in Our Stars’ a few days after I wrote that draft.

I loved the whole experience, save the unwanted spider visit which nearly gave me a heart attack at around 2 a.m. just as I was reading the last two chapters of the book. (The rude arachnid received a lethal blow from my sneaker in return for its insolence)

The movie version of TFioS was superb. I was disappointed, as always, by some of the things left out of the script or modified from the book version, but it was the best new release I’ve seen in several years. I’m sorry to use a tired phrase, but it was refreshing to see something so well-made on every level, which kept the original meaning and depth of such a wonderful story.


~ The End

Art = Me

Art is how I live my life. It always has been, it always will be. Without art, I would be adrift without direction, without purpose, without sense of self, without confidence. 
I remember being at an art workshop when I was about 5 and, having completed the prescribed project – which was, as usual, far too simple and ordinary – I became bored and ambitious and so I began fashioning a complex creation wholly unlike the intended product. A locally well-known artist observed my work as I was applying the final touches and asked, “Do you want to be an artist when you grow up?” I have no recollection of my reply, but according to my mother I shocked everyone in the vicinity with a decisive “No.” My mother and the gentleman were entirely confused until I clarified: “I already AM an artist.” I received a warm and happy gaze of pride from my mother, and the gentleman gave me a slightly crooked, but trustworthy grin of approval that seemed to say ‘I like this kid’. He then joined me in my deviant art and made for me a set of unconventional panpipes held together with pipe cleaners and painted with red and black flowers. 
I still have that set of panpipes, somewhere in a box of keepsakes. I find it every now and then, remember that day, and smile…and try, unsuccessfully as always, to coax a note or two out of the little souvenir. 


Me

An Empty Chair

“We must begin our story, sad to say, with an empty chair.
If it were not empty, we would not have a story.
But it is, and we do, and it is time to tell it.”
~Opening scene of ‘Nanny McPhee’~

My mom and I always liked the way this chair from the movie ‘Nanny McPhee’ was almost a character, regarded with respect and thought to be representative of or inhabited by the kind, watchful, caring spirit of the mother to whom the chair belonged. The opening lines of the movie, introducing the chair and establishing that its owner was no longer living, both charmed and saddened us. Lately I haven’t been able to get the scene out of my head. Now that the mother’s empty chair is a reality in my life, I’m grateful to have the wonderful, happy memories of my mom that come along with the sadness.

scan0005

Time To Type

For some time now, I’ve been toying with the idea of starting a blog. I mean, I love to write, and I often receive compliments on my eloquent ramblings, so I figured – ‘why not?!’. With all the crazy philosophical, poetic, and just plain random things I have constantly bouncing around in my head, this may be just what I need to remain sane.

I was forgetting that nearly all of my endeavors, sooner or later, suffer the effects of my chronic Procrastinationitis. So here I am, two months after my intentional “blog launch” date, publishing my first comment.

anna in technicolor

Creating a beautiful life, one stitch at a time

JACSnews

Just me writing about fun stuff!

Pelty's Providence

My (mis)adventures in Providence

~LaughingNymph~

Just another WordPress.com site

WordPress.com News

The latest news on WordPress.com and the WordPress community.